SV——SV实现blueprint

0. 介绍

蓝图模式(blueprint)是“绿皮书”第八章将的一个点,它是通过层次引用,将generator产生的transaction类型改变,这样可以实现错误注入,使generator产生不同类型的transaction(这些transaction都要继承自定义在generator中的transaction)。

1. 框图

error_tr继承自blueprint类型,在top层,通过层次引用,将blueprint对象替换成error_tr对象。

2. trans类型作为blueprint

1
2
3
4
5
6
7
8
9
10
11
12
13
14
15
16
17
18
19
20
21
22
23
24
25
26
27
28
29
30
31
32
33
34
35
36
37
38
39
40
class trans;

rand bit [7:0] A;
rand bit [7:0] B;
rand operation_e op;
string name;

function new(string name="trans");
this.name=name;
endfunction

constraint c_data {
A inside {[10:20]};
B inside {[30:40]};
}

constraint c_op {
op dist {
add_op:=1,
and_op:=1,
xor_op:=1,
mul_op:=1
};
}

function void print();
$display("@%0t : %s :",$time,name);
$display("@%0t : A is %d",$time,A);
$display("@%0t : B is %d",$time,B);
$display("@%0t : op is %3b",$time,op);//enum do not need transform to bit[2:0]
endfunction
// transaction的复制函数
function trans copy();//copy is the return
copy=new(); // new copy first
copy.A=this.A;
copy.B=this.B;
copy.op=this.op;
endfunction

endclass

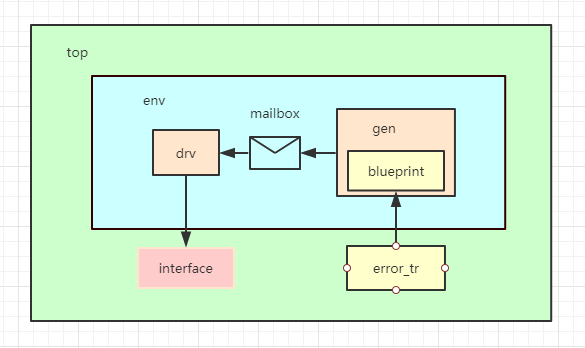
3. error_trans继承自trans类型

1
2
3
4
5
6
7
class error_trans extends trans;

constraint c_data {
A inside {[0:9]};
B inside {[0:9]};
}
endclass

在error_trans中,我们重载了约束c_data,使得A,B的值在0到9之间。

我们在后面可以观察它的执行结果

4. generator中

通常我们建议在generator中发送transaction的时候写成如下:

1
2
3
4
5
6
7
8
task generator::run();
trans tr; //定义对象句柄
repeat(5) begin
tr=new(); //在循环中创建对象,每次发送的对象都不同
assert(tr.randomize);
mlb.put(tr);
end
endtask

但是我们想要通过层次引用替换generator中要发送的transaction,所以我们希望在run之前就已经创建了对象,然后再替换它。

所以我们要写成如下的形式:

1
2
3
4
5
6
7
8
9
10
class generator;
trans tr;// 这里的tr就是blueprint,会在顶层被替换
function new();
tr=new(); //创建transaction对象。
endfunction
task run();
assert(tr.randomize);
mbl.put(tr.copy());//这里传递的是tr的一个复制
endtask
endclass

完整的generator如下:

1
2
3
4
5
6
7
8
9
10
11
12
13
14
15
16
17
18
19
20
21
22
23
class generator;

mailbox#(trans) gen_mlb;
trans gen_tr;// 这里的gen_tr就是blueprint,会在顶层被替换

function new(input mailbox#(trans) mlb);
this.gen_mlb = mlb;
gen_tr=new(); //create gen_tr
endfunction

virtual task build;
gen_mlb=new();
endtask

virtual task run;
repeat(10)begin
// gen_tr=new();
assert(gen_tr.randomize());
gen_mlb.put(gen_tr.copy());//这里传递的是tr的一个复制
end
endtask

endclass

5. 在top层替换blueprint

1
2
3
4
5
6
7
8
9
10
11
12
13
14
15
16
17
18
19
20
21
22
23
24
25
26
27
28
29
30
31
32
module top;

import cb_pkg::*;
bp_bfm bfm();
enviroment env;

initial begin
env=new(bfm);
env.build();

`ifdef BLUEPRINT
begin
//error_trans replace trans;
//error_trans's A inside [0:9],B inside [0:9]
error_trans err_tr; //定义error_trans
err_tr=new();
env.gen.gen_tr=err_tr; //hierarchy reference 层次引用替换generator中的gen_tr
$display("@ %0t : **** BLUEPRINT ****",$time);
end
`endif

`ifdef CALLBACK
begin
user_cb ucb;
ucb=new();
env.drv.cb_queue.push_back(ucb);
end
`endif
env.run();
end

endmodule

6. 观察结果

如果我们定义了宏BLUEPRINT,那么就会进行blueprint替换,结果如下,可以看到A,B的取值范围在0到9之间。

1
2
3
4
5
6
7
8
9
10
11
@ 0 : **** BLUEPRINT ****
@ 0 : driver one pkg!!!
@0 : trans :
@0 : A is 7
@0 : B is 9
@0 : op is 011
@ 10000 : driver one pkg!!!
@10000 : trans :
@10000 : A is 6
@10000 : B is 7
@10000 : op is 011

如果我们将宏BLUEPRINT注销,会看到A的值在10到20之间,B的值在30到40之间。

1
2
3
4
5
6
7
8
9
10
@ 0 : driver one pkg!!!
@0 : trans :
@0 : A is 19
@0 : B is 33
@0 : op is 001
@ 10000 : driver one pkg!!!
@10000 : trans :
@10000 : A is 14
@10000 : B is 39
@10000 : op is 011

7. 代码详情

代码


本博客所有文章除特别声明外,均采用 CC BY-SA 4.0 协议 ,转载请注明出处!