更新 09-28 之前遇到的问题解决了,可以生成激励、正确自检和收集覆盖率。
代码 h.add_coverage_modified
0. 介绍 这几天为了准备面试,基于自己的思路写了一个验证平台,DUT是个ALU。
这个验证平台是逐步完善的,不断的迭代,最终可以测试ALU的计算,这里介绍的是添加了scoreboard之后可以进行随机激励生成、自检、覆盖率采样的版本。详细代码在链接里。
代码地址
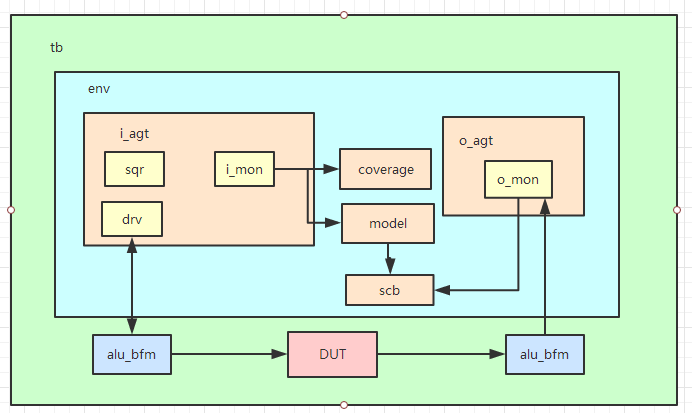
1. 验证平台组成
上图中agent是复用的,通过is_active变量的值来决定要例化哪些组件。
在接口alu_bfm中进行时钟生成、reset任务、monitor采样、driver驱动等
2. DUT介绍 这里的ALU用的是《UVMPrimer》 书中的DUT。
端口如下:
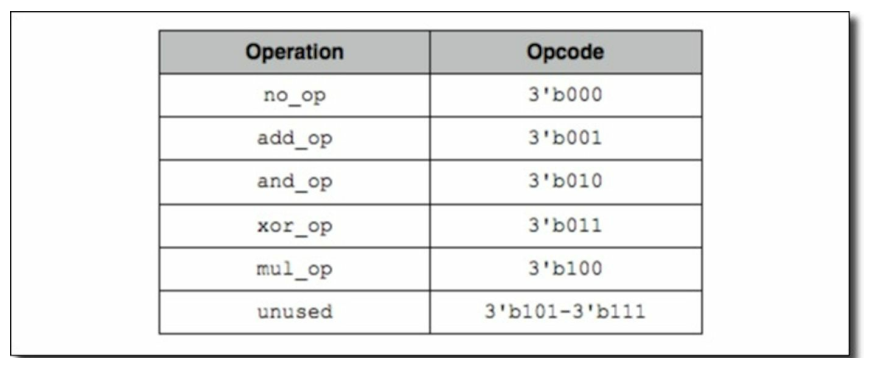
操作指令的编码如下:
其实在生成激励的时候,只生成了add、and、xor指令,其他的通过设置权重,不让他们生成,因为这个验证平台还是稍微优点问题的,以后有机会改一下。
这样的话它的覆盖率总是会比较低,不过权当作搭建tb的练习了。
接口的时序:
start信号为高,输入op、A、B有效,DUT在上升沿采样这些数据。当验证平台采样到DUT输出done为高时,说明计算结束,tb将start拉低(可以在下降沿检测done是否为高,如果为高,那么在下一个上升沿start拉低),done信号只持续一个时钟周期。
覆盖率采集:
所有操作的输入都是0;
所有操作的输入都是1;
reset后执行所有操作;
执行所有操作后reset;
连续两个周期执行同一个指令;
单周期指令与多周期的乘法指令间切换
3. 激励生成 激励是在sequence中生成的。
在sequence中控制objection,pre_body中raise_objection,post_body中drop_objection。
也可以控制随机约束。
1
2
3
4
5
6
7
8
9
10
11
12
13
14
15
16
17
18
19
20
21
22
23
task pre_body();if (starting_phase != null ).raise_objection (this );"sequence0" ,"pre_body" ,UVM_LOW)endtask task body();"sequence0" ,"body" ,UVM_LOW)repeat (50 ) begin assert (tr.randomize );end 1000 ;endtask task post_body();"sequence0" ,"post_body" ,UVM_LOW)if (starting_phase!=null ).drop_objection (this );endtask
4. driver驱动激励到接口 在接口中定义驱动激励的任务drive_one_pkg,
1
2
3
4
5
6
7
8
9
10
11
12
13
14
15
16
17
18
19
20
21
22
23
24
25
26
27
28
29
task drive_one_pkg(transaction tr);if (tr.op == rst_op) begin posedge clk);1'b0 ;1'b0 ;posedge clk);1 ;1'b1 ;end else begin negedge clk);.op ;.A ;.B ;1'b1 ;if (tr.op == no_op) begin posedge clk); 1 ;1'b0 ;end else begin do negedge clk);while (done==0 );.result = result;1'b0 ;end end endtask
我们在driver的run_phase中通过虚接口调用这个函数就行了。
driver中,可以在从sequencer取transaction之前,调用接口的reset任务复位DUT。
1
2
3
4
5
6
7
8
9
10
11
task driver::run_phase(uvm_phase phase);super .run_phase (phase);"driver" ,"run_phase" ,UVM_LOW);.reset_alu ();while (1 ) begin .get_next_item (req);.drive_one_pkg (req); .item_done ();end endtask
5. 输入monitor采样接口数据 输入monitor的采样是在接口中进行的,并将采样到的值,通过调用输入monitor的任务,从port传给model。
在接口中的采样代码如下,通过always块,在每个时钟沿采样:
1. 我们需要判断DUT接口上的值是否是有效的输入,通过判断start信号是否为高;
2. 另一个防止对同一个计算数据(op、A、B)采样了多次,我们需要判断当前的指令是否是新的指令,start下降沿表示一条指令执行完成,那么接下来又采样到start为高,就说明此时是新的指令了。
接口中的always如下:
1
2
3
4
5
6
7
8
9
10
11
12
13
14
15
16
17
command_monitor command_monitor_h;always @(posedge clk ) begin static bit new_command=0 ;if (!start) begin 1'b1 ;end else if (start) begin if (new_command) begin $display ("[collect ****]" );$display ("op is %d" ,op);.collect_one_pkg (A,B,op2enum());end end end
monitor中的操作:
将句柄传递给接口
通过port发送给model
1
2
3
4
5
6
7
8
9
10
11
12
13
14
15
function void connect_phase(uvm_phase phase); .command_monitor_h =this ;endfunction task collect_one_pkg(byte A,byte B,operation_t op);new ("tr" );.A =A;.B =B;.op =op;.write (cmd_mon_tr);`ifdef CMD_MON_PRINT .print ();`endif endtask
6. 参考模型接受输入采样,产生预测输出 我的参考模型使用SV实现的
1
2
3
4
5
6
7
8
9
10
11
12
13
14
15
16
17
18
19
20
21
22
23
24
25
26
27
28
29
30
31
32
33
34
35
36
37
38
39
40
41
42
43
44
45
46
47
48
49
50
class model extends uvm_component;virtual alu_bfm bfm;#(transaction) port;#(result_transaction) ap;function new (string name="modle" ,uvm_component parent = null );super .new (name,parent);endfunction function void build_phase(uvm_phase phase);super .build_phase (phase);new ("port" ,this );new ("ap" ,this );if (!uvm_config_db#(virtual alu_bfm)::get(this,"","bfm",bfm)) "model" ,"Faile get bfm!!!" );endfunction task run_phase(uvm_phase phase);while (1 ) begin .get (model_get_tr);"model" ,"model get transaction!!!" ,UVM_LOW);`ifdef MODEL_PRINT "model" ,"print model_get_tr" ,UVM_LOW);.print ();`endif new ("model_result_tr" );posedge bfm.done );case (model_get_tr.op ).result =model_get_tr.A +model_get_tr.B ;.result =model_get_tr.A &model_get_tr.B ;.result =model_get_tr.A ^model_get_tr.B ;.result =model_get_tr.A *model_get_tr.B ;endcase .write (model_result_tr);`ifdef MODEL_PRINT "model" ,"print model_result_tr" ,UVM_LOW);.print ();`endif end endtask endclass
7. 输出monitor采样DUT真实值 输出monitor和输入monitor差不多。
在接口中采样输出:
1
2
3
4
5
6
result_monitor result_monitor_h;always @(posedge clk) begin if (done).collect_one_pkg (result);end
monitor中:
1
2
3
4
5
6
7
8
9
10
task collect_one_pkg(shortint result);new ("result_tr" );.result =result;.write (result_mon_tr);`ifdef RESULT_MON_PRINT "result_monitor" ,"print result_mon_tr" ,UVM_LOW);.print ();`endif endtask
8. scoreboard中比较预测值和真实值 因为参考模型的计算不需要是时钟周期的,所以可以看成拿到输入立马可以计算出预测值,在scoreboard将所哟model发出的预测值先存在一个队列中,当真实值到来的时候,逐次从这个队列中取预测值进行判断就可以了。
1
2
3
4
5
6
7
8
9
10
11
12
13
14
15
16
17
18
19
20
21
22
23
24
25
26
27
28
29
30
31
32
33
34
35
36
37
38
39
40
41
42
43
44
45
46
47
48
49
50
51
52
53
54
55
56
57
58
59
60
61
class scoreboard extends uvm_scoreboard;#(result_transaction) rly_port;#(result_transaction) exp_port;function new (string name="scb" ,uvm_component parent=null );super .new (name,parent);endfunction function void build_phase(uvm_phase phase);super .build_phase (phase);new ("rly_port" ,this );new ("exp_port" ,this );endfunction task run_phase(uvm_phase phase);bit result;super .run_phase (phase);fork while (1 ) begin .get (exp_tr);.push_back (exp_tr);`ifdef SCB_PRINT .print ();`endif end while (1 ) begin .get (rly_tr);`ifdef SCB_PRINT .print ();`endif if (exp_queue.size ()>0 ) begin .pop_front ();.compare (tmp_tr);if (result)"scoreboard" ,"Compare SUCCESSLY!!!" ,UVM_LOW);end else begin "scoreboard" ,"Get from DUT,while can not get from model" );`ifdef SCB_PRINT .print ();`endif end end join endtask endclass
9. 覆盖率组件 覆盖率是用单独的组件来收集的,输出monitor中的analysis port端口会将采样的数据传给model和coverage。
我的coverage是继承自uvm_subscripter,这个类中有一个analysis_export的对象,自己写一个write函数,在coverage中定义覆盖组,在这个write函数中采集覆盖组。这样,每次输入monitor通过analysis_port传递数据的时候就会调用coverage中的write函数来采集覆盖率信息。
1
2
3
4
5
6
7
8
9
10
11
12
13
14
15
16
17
18
19
20
21
22
23
24
25
26
27
28
29
30
31
32
33
34
35
36
37
38
39
40
41
42
43
44
45
46
47
48
49
50
51
52
53
54
55
56
57
58
59
60
61
62
63
64
65
66
67
68
class coverage extends uvm_subscriber#(transaction) ;byte unsigned A;byte unsigned B;bit [2 :0 ] op;function new (string name="coverage" ,uvm_component parent=null );super .new (name,parent);new ();new ();endfunction covergroup data;coverpoint op{ignore_bins all_op={rst_op,no_op};coverpoint A{bins zeros = {'h00 };bins ones = {'hff };bins others={['h01 :'hfe ]};coverpoint B{bins zeros = {'h00 };bins ones = {'hff };bins others={['h01 :'hfe ]};cross a_cov,b_cov,all_op{bins add_00= binsof (all_op) intersect {add_op} &&binsof (a_cov.zeros ) || binsof (b_cov.zeros ));bins add_FF= binsof (all_op) intersect {add_op} &&binsof (a_cov.ones ) || binsof (b_cov.ones ));bins and_00 = binsof (all_op) intersect {and_op} &&binsof (a_cov.zeros ) || binsof (b_cov.zeros ));bins and_FF = binsof (all_op) intersect {and_op} &&binsof (a_cov.ones ) || binsof (b_cov.ones ));bins xor_00 = binsof (all_op) intersect {xor_op} &&binsof (a_cov.zeros ) || binsof (b_cov.zeros ));bins xor_FF = binsof (all_op) intersect {xor_op} &&binsof (a_cov.ones ) || binsof (b_cov.ones ));bins mul_00 = binsof (all_op) intersect {mul_op} &&binsof (a_cov.zeros ) || binsof (b_cov.zeros ));bins mul_FF = binsof (all_op) intersect {mul_op} &&binsof (a_cov.ones ) || binsof (b_cov.ones )); ignore_bins others_only=binsof (a_cov.others ) && binsof (b_cov.others );endgroup covergroup cmd;coverpoint (op){bins rst2op[]=(rst_op=>[add_op:mul_op]),(rst_op=>no_op);bins op2rst[]=([add_op:mul_op]=>rst_op),(no_op=>rst_op);bins op[]={[add_op:mul_op],no_op,rst_op};bins twoops[]=([no_op:mul_op][*2 ]);endgroup function void write(transaction t);.A ;.B ;.op ;.sample ();.sample ();endfunction endclass
10. top module 1 2 3 4 5 6 7 8 9 10 11 12 13 14 15 16 17 18 19 20 21 22 23 24 25 26 module top;import uvm_pkg::*;import tb_pkg::*;`include "uvm_macros.svh" .clk (bfm.clk ),.reset_n (bfm.reset_n ),.A (bfm.A ),.B (bfm.B ),.op (bfm.op ),.start (bfm.start ),.result (bfm.result ),.done (bfm.done )initial begin #(virtual alu_bfm)::set(null,"*","bfm",bfm) ; end initial begin end endmodule
注意上面uvm_config_db设置虚接口的语句,一定要写在run_test()语句之前,要不然会出错。
1 UVM_FATAL comp/driver.sv (15 ) @ 0 : uvm_test_top.env .i_agt .drv [driver] Failed get bfm!!!
验证平台运行 运行的脚本都写在Makefile文件中,运行时执行下面命令就行了。
make:会进行编译仿真,验证平台会生成随机激励、自检
make urg:会收集覆盖率信息,生成一个both文件,里面存折html格式的覆盖率报告。
make dve:会启动dve,查看仿真波形